管理应用程序数据
1. 数据卷
1.1 简介
在Docker的使用过程中往往需要对数据进行持久化,或者需要在多个容器之间进行数据共享,所以这就涉及到Docker容器的数据操作。 容器中数据管理主要有两种方式:数据卷和数据卷容器。
- 数据卷(Data Volumes) 容器内数据直接映射到本地宿主机。
- 数据卷容器(Data Volume Containers) 使用特定容器维护数据卷。
1.2 数据卷
数据卷是一个特殊的目录,它将主机目录直接映射进容器。可供一个或多个容器使用。
数据卷设计的目的就是为了 数据的持久化,它完全独立与容器的生命周期。因此,容器删除时,不会删除其挂载的数据卷,也不会存在类似的垃圾机制对容器存在的数据卷进行处理。
1.3 数据卷特点
- 数据卷在容器启动时初始化,如果容器使用的镜像在挂载点包含了数据,这些数据会拷贝到新初始化的数据卷中
- 数据卷可以在容器之间共享和重用
- 可以对数据卷里的内容直接修改,修改回马上生效,无论是容器内操作还是本地操作
- 对数据卷的更新不会影响镜像的更新
- 数据卷会一直存在,即使挂载数据卷的容器已经被删除
2. 数据卷挂载
Docker提供三种方式将数据从宿主机挂载到容器中
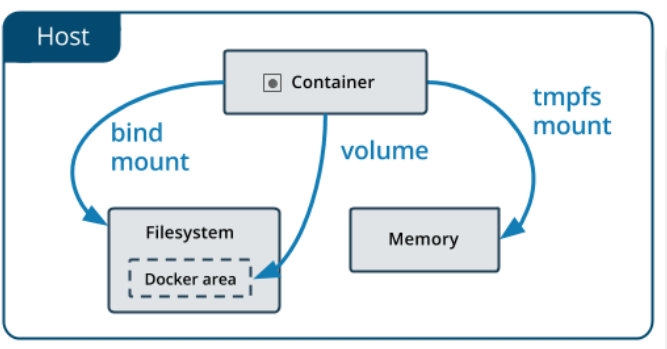
- volumes:Docker管理宿主机文件系统的一部分(/var/lib/docker/volumes)。保存数据的最佳方式。bind mounts:将宿主机上的任意位置的文件或者目录挂载到容器中。
- tmpfs:挂载存储在主机系统的内存中,而不会写入主机的文件系统。如果不希望将数据持久存储在任何位置,可以使用tmpfs,同时避免写入容器可写层提高性能。
其中tmpfs的数据只保存在容器的内存中暂不讨论,而Volumes也叫Docker Managed Volume。
2.1 Volume特点
- 多个运行容器之间共享数据。
- 当容器停止或被移除时,该卷依然存在。
- 多个容器可以同时挂载相同的卷。
- 当明确删除卷时,卷才会被删除。
- 将容器的数据存储在远程主机或其他存储上
- 将数据从一台Docker主机迁移到另一台时,先停止容器,然后备份卷的目录(/var/lib/docker/volumes/)
2.2 Bind Mounts特点
- 从主机共享配置文件到容器。默认情况下,挂载主机/etc/resolv.conf到每个容器,提供DNS解析。
- 在Docker主机上的开发环境和容器之间共享源代码。例如,可以将Maven target目录挂载到容器中,每次在Docker主机上构建Maven项目时,容器都可以访问构建的项目包。
- 当Docker主机的文件或目录结构保证与容器所需的绑定挂载一致时
2.3 volume
volume是docker上的数据卷使用的,而bindmount是和linux宿主机文件打交道的。
管理卷:
# docker volume create nginx-vol
# docker volume ls
# docker volume inspect nginx-vol

用卷创建一个容器:
# docker run -d --name=nginx-test --mount src=nginx-vol,dst=/usr/share/nginx/html nginx
# docker run -d --name=nginx-test -v nginx-vol:/usr/share/nginx/html

nginx清理:
# docker stop nginx-test# docker rm nginx-test
# docker volume rm nginx-vol

注意:
    1. 如果没有指定卷,自动创建。
    2. 建议使用--mount,更通用。
操作
查看当前数据卷
[root@localhost ~]# docker volume ls
DRIVER              VOLUME NAME

创建数据卷名字为nginx-vol
[root@localhost ~]# docker volume create nginx-vol
nginx-vol

查看书卷
[root@localhost ~]# docker volume ls
DRIVER              VOLUME NAME
local               nginx-vol

查看数据卷详情
[root@localhost ~]# docker volume inspect nginx-vol
[
    {
        "CreatedAt": "2019-04-14T23:07:41-04:00",
        "Driver": "local",
        "Labels": {},
        "Mountpoint": "/var/lib/docker/volumes/nginx-vol/_data",   < --- 挂载点
        "Name": "nginx-vol",                                       < --- 数据卷名称
        "Options": {},
        "Scope": "local"
    }
]

[root@localhost ~]# docker run -d -p 90:80 --mount src=nginx-vol,dst=/usr/share/nginx/html nginx
3781a6fad3d7ed89e4c61831a776792539be47925e851bf4eb0acf970d68c88d
[root@localhost ~]# ls /var/lib/docker/volumes/nginx-vol/_data/
50x.html  index.html
[root@localhost ~]# curl 127.0.0.1:90
<!DOCTYPE html>
<html>
<head>
<title>Welcome to nginx!</title>
<style>
    body {
        width: 35em;
        margin: 0 auto;
        font-family: Tahoma, Verdana, Arial, sans-serif;
    }
</style>
</head>
<body>
<h1>Welcome to nginx!</h1>
<p>If you see this page, the nginx web server is successfully installed and
working. Further configuration is required.</p>

<p>For online documentation and support please refer to
<a href="http://nginx.org/">nginx.org</a>.<br/>
Commercial support is available at
<a href="http://nginx.com/">nginx.com</a>.</p>

<p><em>Thank you for using nginx.</em></p>
</body>
</html>

删除容器
[root@localhost ~]# docker ps -l
CONTAINER ID        IMAGE               COMMAND                  CREATED             STATUS              PORTS                NAMES
3781a6fad3d7        nginx               "nginx -g 'daemon of…"   52 seconds ago      Up 51 seconds       0.0.0.0:90->80/tcp   elastic_sanderson
[root@localhost ~]# docker rm -f 3781a6fad3d7
3781a6fad3d7
[root@localhost ~]# ls /var/lib/docker/volumes/nginx-vol/_data/
50x.html  index.html
删除完以后数据还在,做到了持久化了。

修改源文件,再次挂载之前的数据卷
[root@localhost ~]# echo '<h1>hello docker</h1>' > /var/lib/docker/volumes/nginx-vol/_data/index.html
[root@localhost ~]# docker run -d -p 90:80 --mount src=nginx-vol,dst=/usr/share/nginx/html nginx
2178fc9052f918a2eb2b0ea790f4fcb8c2c075b567f707324b715b33339a6512
[root@localhost ~]# curl 127.0.0.1:90
<h1>hello docker</h1>
说明正常。

删除数据卷后,数据也没了
[root@localhost ~]# docker rm -f $(docker ps -a |awk '{print $1}')
2178fc9052f9
ec0fcb3bf39a
Error: No such container: CONTAINER
[root@localhost ~]# docker volume rm nginx-vol
nginx-vol
[root@localhost ~]# ls /var/lib/docker/volumes/nginx-vol/_data/
ls: cannot access /var/lib/docker/volumes/nginx-vol/_data/: No such file or directory


没有定义数据卷,直接使用的话,就自动创建
[root@localhost ~]# docker volume ls
DRIVER              VOLUME NAME
[root@localhost ~]# docker run -d -p90:80 --name=nginx-test --mount src=nginx-vol,dst=/usr/share/nginx/html nginx
44e79c4c0b19be4bdd26d1fec5b1def72050072d5da480c6f1ed91a269f15624
[root@localhost ~]# docker volume ls
DRIVER              VOLUME NAME
local               nginx-vol
[root@localhost ~]# docker ps -l
CONTAINER ID        IMAGE               COMMAND                  CREATED              STATUS              PORTS                NAMES
44e79c4c0b19        nginx               "nginx -g 'daemon of…"   About a minute ago   Up About a minute   0.0.0.0:90->80/tcp   nginx-test
[root@localhost ~]# curl 127.0.0.1:90
<!DOCTYPE html>
<html>
<head>
<title>Welcome to nginx!</title>
<style>
    body {
        width: 35em;
        margin: 0 auto;
        font-family: Tahoma, Verdana, Arial, sans-serif;
    }
</style>
</head>
<body>
<h1>Welcome to nginx!</h1>
<p>If you see this page, the nginx web server is successfully installed and
working. Further configuration is required.</p>

<p>For online documentation and support please refer to
<a href="http://nginx.org/">nginx.org</a>.<br/>
Commercial support is available at
<a href="http://nginx.com/">nginx.com</a>.</p>

<p><em>Thank you for using nginx.</em></p>
</body>
</html>
2.4 bind mounts
bind mount方式会覆盖原有的目录中文件。
docker run -d -p99:80 --mount type=bind,src=$PWD/www_root,dst=/usr/share/nginx/html nginx
系统区别
[root@localhost ~]# mkdir www_root
[root@localhost ~]# docker run -d -p99:80 --mount type=bind,src=$PWD/www_root,dst=/usr/share/nginx/html nginx
9cc33517a9ab1807756cb993920855dcfde73aac073f5cd2420b5eb60e7c6e74

[root@localhost ~]# echo '<h1>hello docker bind mount</h1>'>www_root/index.html
[root@localhost ~]# ls www_root/index.html
www_root/index.html
[root@localhost ~]# curl 127.0.0.1:99
<h1>hello docker bind mount</h1>